


Black and White Nails: 14 Ideas, from Black French Tips to Checkerboard
Fourteen black and white nail designs, from milky French tips to checkerboard and cat eye, and the gel method that keeps black out of your white.
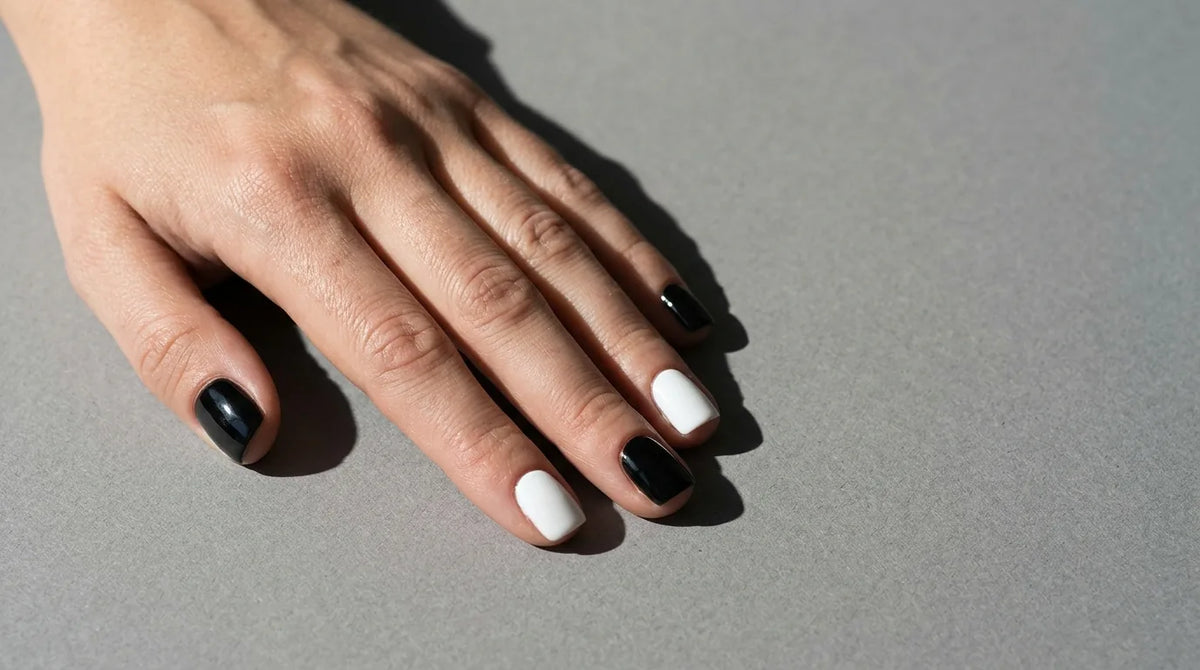

Black and white nails go with every outfit, every season and every nail length, from short square nails at the office to long almond nails at a wedding. The two colours are easy to wear but hard to apply cleanly, so the method matters as much as the design.
This guide covers the gel method for a clean result, 14 ideas in three groups, and advice for short nails and fills. For black on its own, see our guide to black nail designs.
Black and white are the hardest pair in gel, because each colour fails in its own way. Black pigment is strong: a trace of it on the brush, or uncured black touching uncured white, turns the white grey. White shows every streak, and a thick white coat is the most likely to stay soft underneath and wrinkle.
These steps keep both colours clean:
Paint the lighter colour first and add black details on top: black keeps a crisp edge on cured white, and a mistake in the white is easy to hide under black. White dots or tips on a black nail are the exception.
Gloss makes the contrast sharper, while matte gives black a velvet finish and makes white flat and chalky. Yellowing shows on white first, so choose a top coat that resists it: Diamond Top Coat is a no-wipe top coat with a mirror shine that does not yellow, including over whites. For a beach holiday, UV Filter Top Coat has a built-in UV filter that helps keep whites from yellowing and helps protect the manicure from sunlight.
The designs need three tools: a fine liner brush, a dotting tool and a small flat brush for clean-up. Elegelli does not sell them, but our guide to nail art brushes and tools explains what to look for in each.
The easiest design here needs no line work. Alternate black and white from finger to finger, or paint only the ring fingers in the second colour. It suits the office and any nail length. Cure each colour and finish with Diamond Top Coat. If your natural nails are weak or bend easily, build them instead in B024 Noir Épi, a deep velvety black builder gel, and B027 Blanc Meije, a frosted white, curing each layer for 60 seconds under LED or 120 seconds under UV.
A milky base with a thin black tip is a quiet take on the French manicure. Paint one or two thin coats of 189 Milky White, a soft milky white with a sheer finish, and cure. With a fine liner and 001 Black, draw the smile line in one stroke from one side wall to the other, then fill in towards the free edge, cap it, cure and seal with top coat. On weak natural nails, build the base first in B003 Milky White builder gel, then add the black tip in gel polish.

Reversing the colours gives a bolder French for evenings and dark winter clothes. Paint the whole nail in 001 Black and cure, then draw the tip in 002 White with a liner brush. Go over the white twice, curing each pass, so no black shows through, then seal with top coat. Keep the tip narrow, because a deep white tip makes a short black nail look shorter.
Each nail is split in two, black on one side and white on the other. Paint the whole nail white and cure. With your little finger resting on the table to steady the hand, draw a straight black line with a liner from the centre of the cuticle to the centre of the free edge, then fill in one side, cure and seal with top coat. A vertical split suits long nails best, while a diagonal split from corner to corner works better on short nails.
Dots work both ways, white on black or black on white. Dip a dotting tool in the gel, touch it to the nail without pressing and lift straight up. Re-dip after every dot or two so the dots stay the same size. White dots on black need two layers: cure the first dots, add a second dot on top of each, cure again and seal with top coat. Our polka dot nails article covers spacing and dot sizes.

A checkerboard is a simple grid, and it looks better on one or two accent nails than on all ten. Start on a cured white base:
On a short nail, three or four squares across are enough.

Thin black stripes on white are a good first step into line art. Start on a cured white base, load a long, fine liner lightly with black and pull each line from the cuticle to the tip in one movement. Vertical stripes make short nails look longer, and horizontal stripes suit long nails. Keep to two or three lines on two nails, cure them, then seal with top coat and cap the free edge.
Wavy lines are more forgiving than straight ones, because a small wobble becomes part of the design. Build a sheer milky base with two thin coats of 021 Cloud, a soft milky white, and cure. With a fine liner and black, draw two or three thin waves from the side wall towards the tip, or one loose swirl near the cuticle, then cure and seal. Almond and oval nails show the curves best.

Marble is worked wet on wet, so here the black is meant to spread into the white, and it takes some practice. Paint and cure a white base, then apply one more thin coat of white and leave it uncured. Draw a fine black vein across the nail with a liner and soften it straight away with a clean brush. Add one or two thinner veins and cure before they spread too far, then seal with top coat. For more ways to vary the veins, see marble nails with gel.

Cow print is the most playful idea here, better for holidays and festivals than for the office. Paint and cure a white base. With a small brush and black, paint patches of different sizes with rounded, uneven edges, letting some stop at the edge of the nail as if cut off, but keeping the gel off the skin. Patches should not line up from nail to nail, and two accent nails are usually enough. Cure, then finish with top coat.
A grey in the middle turns the two colours into a smooth fade. The easy version runs across the hand: thumb and index finger in white, middle finger in 007 Granite, an earthy grey, ring and little finger in black. The harder version fades on each nail, with white at the cuticle, Granite in the middle and black at the tip. Here the colours are meant to meet uncured: apply all three, blend where they meet with a clean flat brush, then cure and seal with top coat. The blending is explained step by step in ombre nails with gel.
A little silver makes the pair ready for winter parties. Run a line of loose silver glitter where black meets white: press it into a thin uncured layer of top coat, cure, then seal it under more top coat. For silver without loose glitter, build an accent nail in B033 Argent Sterling, a pure metallic silver builder gel, or in B028 Éclat Céleste, a subtle silver, for a quieter result.
Here the contrast comes from the finish as well as the colour. Paint the nails in 001 Black and cure, then add thin white tips in two passes, curing each one. Apply Matte Top Coat over the whole nail and cure, then paint Diamond Top Coat over the white tips only with a fine brush and cure again. Matte Top Coat resists grease marks, which matters on black, and our guide to matte nails explains how to keep the finish clean.

Next to plain white nails, Cat Eye 007 Cosmic Shadow, a black base lit by a silver beam, stays black and white at a glance and adds a band of silver light. Apply one thin coat over the base, hold a magnet over the uncured layer to draw the beam, then cure straight away. Paint the other nails in 002 White and finish every nail with top coat. For a lighter accent that reads silver rather than black, Cat Eye 006 Silver Moon has a cool silver beam. Elegelli does not sell magnets, but any standard nail magnet works with our cat eye gel polish.
Black and white suits short nails as long as the design stays small. Alternating nails, dots and a very thin French tip work best, while a full checkerboard or a deep tip crowds the nail. A short square or squoval shape gives the cleanest edges.
On a short nail the gel sits close to the cuticle and side walls, so keep every layer off the skin to avoid lifting. If your nails are weak or bend easily, a thin builder overlay under the colour adds strength without length.
Regrowth shows more on black than on white, so plan a fill or a removal after about three weeks. Gel polish over Classic Base Coat can be soaked off or filed, and the base soaks off in 10 to 15 minutes. Never peel the gel, because it takes layers of the nail with it.
When the colour sits on builder gel, file back the colour and top coat, keep a thin layer of builder, do an infill at the cuticle and paint the same design or a new one.
Yes, they go with any outfit, from office clothes to an evening dress, and with gold or silver jewellery. Match the design to the occasion: cow print is playful, a milky French with black tips is discreet.
Cure each colour before the other touches it, and clean the brush until no black comes off. If black reaches the white, lift it with a nearly dry brush before curing.
Draw thin black vertical lines on a cured white base and cure, then horizontal lines and cure. Fill every other square with black, cure and seal with top coat.
Yes. Small designs such as alternating nails, dots or a thin black tip suit them best, and vertical lines make them look longer.
Both work. Gloss sharpens the contrast and suits fine lines, while matte gives black a velvet finish. Over white, use a top coat that does not yellow.
Square and squoval nails give the sharpest lines for French tips, stripes and checkerboard. Almond and oval shapes suit wavy lines, marble and a milky French.
The blacks, whites and greys in these ideas come from our gel polish and builder gel collections.
How to Stop Biting Your Nails, and How a Gel Overlay Can Help
10 min read
Summer Toe Nails 2027: 15 Pedicure Colours and Designs
12 min read
Nails for Men: The Men's Manicure, Step by Step
10 min read
French Tip Toes: How to Do a French Pedicure with Gel, Plus 10 Ideas
11 min read
Free delivery from 570 kr
Shipped from Nice, France
Prepared in 1 to 2 business days
For orders placed before 2 pm, Paris time
14-day returns
From the day you receive your order
Secure payment
Encrypted checkout
Nail tech, salon or distributor? Join the Elegelli professional programme for pro pricing.


