


Butterfly Nails: 12 Ideas and How to Paint a Butterfly with Gel
Four teardrop strokes and a fine line make a butterfly. Learn to paint it with gel, then try 12 butterfly nail designs, from one tiny butterfly to full wing nails.
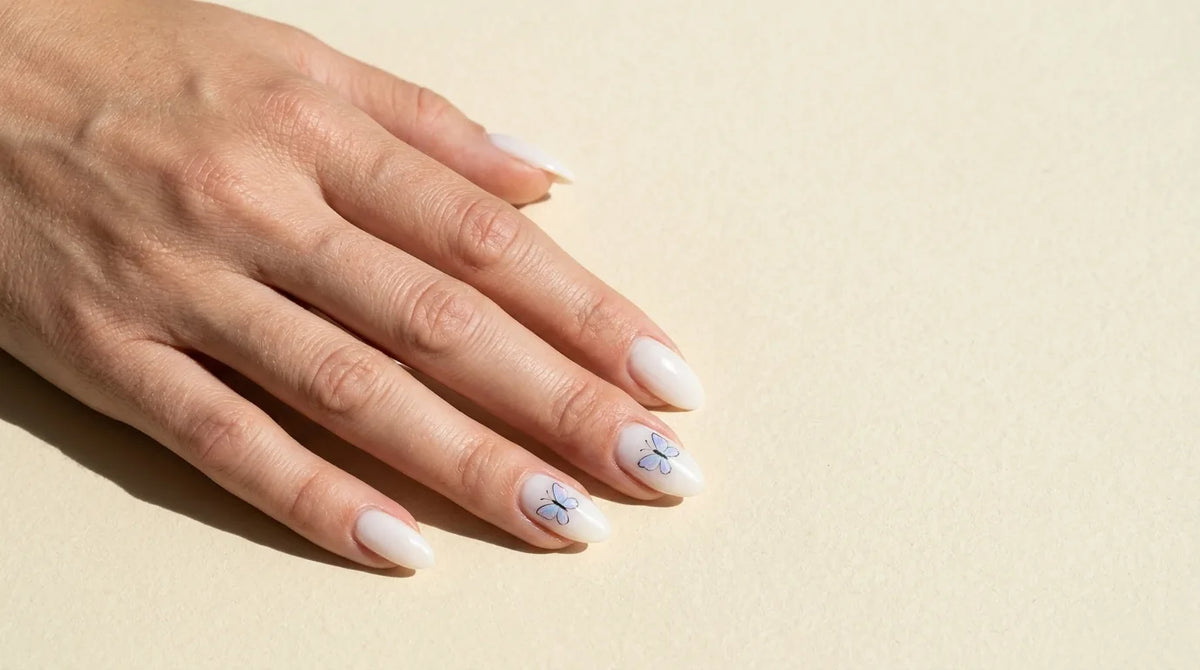

Butterfly nails are one of the easiest motifs to paint by hand with gel: four teardrop strokes, a thin body and two short antennae are all it takes. A fine liner brush, very little gel and a steady hand are enough to start.
The method comes first, then quicker options with stickers and twelve designs, from a single butterfly on milky white nails to full wing nails.
Paint one nail at a time, always on a cured background. A butterfly about half the width of the nail is the easiest size to keep even.

For a first attempt, paint half a butterfly coming out of the side of the nail. The body runs along the side wall, and one upper and one lower wing reach toward the centre. With only two wings to match, the design stays balanced even while your strokes are still uneven.
Drawing the black outline first, curing it and then filling the wings gives a tidy shape, but the colour must stay inside the line. Painting teardrops of colour first and outlining them once cured is easier for most beginners, because the black line hides wobbly edges.
Put a drop of gel on a palette or a piece of foil and pick up only a little at a time, since too much gel spreads and the wings lose their shape. Flash cure each part for a few seconds so a finished wing cannot smudge while you paint the next. Rest the little finger of your painting hand on the table, and turn the nail rather than your wrist. You need only a liner brush with long, thin bristles and a dotting tool; our guide to nail art brushes and tools explains which shapes to choose.
Butterfly stickers and water decals are quicker than painting, and both can be sealed under a gel top coat. Place them on the cured colour and press the edges flat, then apply two thin coats of top coat, curing each, so the edges are fully buried. Blot every trace of water from a decal first, because trapped water can make the top coat lift. You can also set a decoration inside a layer of clear gel, as our guide to encapsulated nails shows.
This quiet version is easy to wear at the office or as a wedding guest. Apply 189 Milky White in two thin coats, curing each, because a sheer shade streaks in one thick coat. On one or two nails, paint a butterfly with 109 Sky on the upper wings and 022 Lilac on the lower ones, then outline it in black. Diamond Top Coat does not yellow over whites. For thin, bendy nails, B003 Milky White builder gel gives a similar milky base with added strength.
Black on nude stands out even from a distance and goes with gold or silver jewellery. Start with 017 Silk, a light silky nude, in one or two thin coats. Then paint one or two small butterflies in 001 Black, as an outline or a filled silhouette. While your lines still wobble, the filled shape is safer, as it hides mistakes. Place each butterfly off centre, near the side wall or close to the tip, as if it had just landed.

A butterfly French works best on short and medium almond or oval nails. For the base, use RB01 Transparent, a crystal-clear rubber base that levels the nail and adds strength, or a sheer pink if you want some colour. Paint a thin tip in 002 White with a liner brush, pulling the line from each side toward the centre so the two halves meet evenly. Once the tip is cured, add one tiny butterfly in Lilac on the bare part of a single nail, just above the smile line.

Pastel butterflies on a white or milky base fit spring holidays, garden parties and daytime weddings. Use Lilac, Sky and 080 Cotton Candy, a soft sugary pink, one colour per nail or all three on one butterfly. Pale shades can streak on small wings, so paint each wing in two thin layers with a flash cure in between. Outline the wings in black or grey, or the pastels fade into the base. Our pastel nail ideas give more pairings.
One butterfly with two or three tiny flowers makes a light spring design that a beginner can manage. For each flower, place five dots of 107 Lavender in a circle with a dotting tool, then one dot of White in the centre. Paint the butterfly on the next nail or just above the flowers, leaving plenty of bare base so the nail does not look crowded. Our flower nail designs offer more flowers to pair with it.
Here the nail itself becomes the wing, so the design needs long almond or stiletto nails. Paint 110 Ocean, a vivid deep blue, on the half near the cuticle and Lilac on the half near the tip, then soften the line where they meet with a clean flat brush. Cure, and repeat for a second coat. With Black and a liner brush, draw thin veins that branch out toward the tip and a thicker border along the free edge, then finish with tiny White dots along the border. This one takes practice, so try it on a spare tip first.

One vivid blue butterfly on a nude nail makes a summer accent that looks good on tanned skin. Apply Silk to every nail, then paint the butterfly on the ring finger, with Ocean on the wings in two thin layers for an even colour. Edge each wing with Black. A little 092 Lagoon, a vibrant turquoise, painted near the body gives the wings depth. Our blue nail designs show other blues for the wings.

A cat eye base gives the wing a band of light that moves with your hand. After the base, apply one thin coat of Cat Eye 006 Silver Moon, which has a cool silver beam. Hold a magnet over the uncured layer until the beam forms a diagonal line, then cure straight away. On the cured layer, paint the wing outline and veins in Black, leaving the wing open so the silver shows through. Elegelli does not sell magnets, but any standard nail magnet works with our cat eye gel polish.
Gold on black suits evening events and works on short square nails as well as long ones. Apply Black and cap the free edge carefully, because chips show quickly on a dark shade. On the ring finger, or on two nails if you prefer, paint one butterfly with a metallic gold nail art gel (we do not sell one; builder gel is not made for fine line work), in two thin passes with a flash cure in between, so the gold is solid and even. For a quicker result, seal a gold sticker under the top coat instead.

A strong red with one black butterfly works well on short nails, because the contrast shows even on a small surface. Apply 029 Candy Apple, a bold, glossy red, in thin coats and keep a very fine gap at the cuticle, because red shows every flooded edge. Paint one black butterfly on the ring finger as a filled silhouette, as a thin outline can disappear against the red.
For a softer finish, paint a few butterflies on a milky or nude base, cure them, then cover the whole nail with B025 Poussière de Diamant, a transparent builder gel with a subtle shimmer. The shimmer sits over the butterflies, and the builder gel adds strength to natural nails. Cure it for 60 seconds under LED or 120 seconds under UV, refine the surface lightly with a file so you do not reach the butterflies, brush away the dust and cleanse the nail, then seal with top coat and cure.
A raised butterfly is best kept to one accent nail on medium or long nails. Use B030 Or Solaire, a builder gel with a golden reflection, and place one small bead for each wing with a thin brush. Shape each bead into a teardrop and flash cure it before the next, then add a small bead of gel along the centre for the body and cure fully. Keep the wings low, because tall shapes catch on hair and knitwear. Our guide to 3D nail art with builder gel explains how to control the height and seal the edges.
On short nails, one accent nail is enough, usually the ring finger, with the others in a plain shade from the design. Keep the butterfly to about a third of the nail's width, or use the half butterfly from the side wall, which leaves more bare base. Designs 3, 9 and 10 all work well on short nails, while the wing nails of idea 6 need length.
Hand-painted butterflies last as long as the gel manicure under them, and our gel polish lasts up to three weeks without chipping or lifting when applied with a base coat and top coat. Stickers, decals and raised designs can wear sooner at the edges, so bury every edge under top coat from the start.
Gel polish can be soaked off or filed off. Builder gel, such as the shimmer veil of idea 11 or the raised butterfly of idea 12, is removed by filing only, starting with the raised parts. If you used a rubber base such as RB01 Transparent in idea 3, follow its instructions: most rubber bases are filed off. Never peel gel off, because it takes layers of the natural nail with it.
With a liner brush, paint four teardrops pulled toward the centre: two larger upper wings and two smaller lower ones. Add a line for the body, two short antennae and a few dots, then cure and seal with a top coat.
Yes. Keep the butterfly small and put it on one accent nail, or paint half a butterfly coming out of the side wall, which needs very little length.
Blue, lilac and pink are popular wing colours, usually with a black outline for contrast. Black butterflies stand out on nude and red bases, and gold shows up well on black.
Yes. Press the sticker flat on the cured colour, then seal it with two thin coats of gel top coat, curing each, so that no edge is left to catch and lift.
Up to three weeks with gel polish over a base coat and under a top coat. Stickers and raised designs can wear sooner at the edges.
Butterflies are a popular nail motif in spring and summer. Small hand-painted butterflies on milky or nude nails are easy to wear to work, while wing nails and gold on black are better kept for holidays and evenings.
The blues, lilacs and pinks in these designs come from our gel polish range, while the shimmer veil and the raised golden butterfly are made with our builder gels.
How to Stop Biting Your Nails, and How a Gel Overlay Can Help
10 min read
Summer Toe Nails 2027: 15 Pedicure Colours and Designs
12 min read
Nails for Men: The Men's Manicure, Step by Step
10 min read
French Tip Toes: How to Do a French Pedicure with Gel, Plus 10 Ideas
11 min read
Free delivery from ¥14,000
Shipped from Nice, France
Prepared in 1 to 2 business days
For orders placed before 2 pm, Paris time
14-day returns
From the day you receive your order
Secure payment
Encrypted checkout
Nail tech, salon or distributor? Join the Elegelli professional programme for pro pricing.


