


Heart Nails: 14 Heart Nail Designs and How to Paint a Heart with Gel
Three ways to paint a heart with gel, how to fix and seal it, and 14 heart nail designs, from one hidden heart to a raised heart in builder gel.
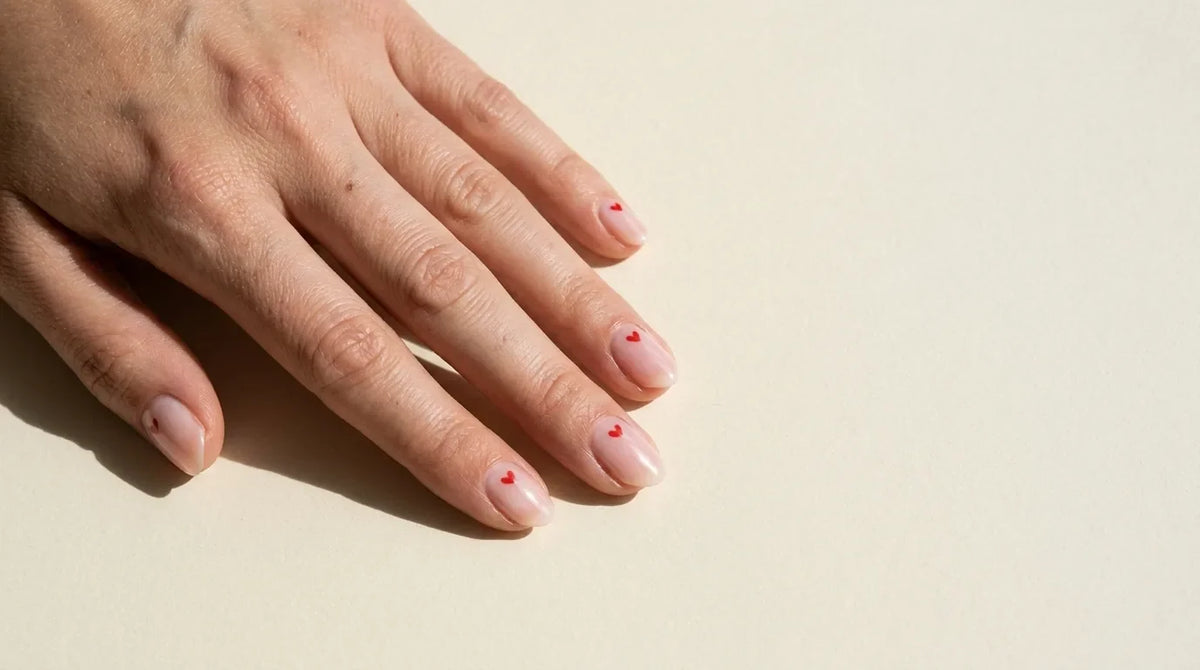

Heart nails are the easiest nail art to start with: one small heart takes only a few minutes to paint, and it works on almost any base, from a milky nude for the office to a deep raspberry, and in any colour from soft pink to plum-pink. Below are three ways to paint a heart with gel, how to keep both halves even and seal it flat, and 14 heart nail designs with their base, tool and order of steps.
A heart is two curves and a point, so it stays recognisable even at two or three millimetres wide. Small flaws hardly show either: a heart that leans a little still reads as a heart from across a room.
The motif is not tied to one date either. Our Valentine's Day nail ideas cover red and pink sets for 14 February, while the designs below are meant for any season.
You need a dotting tool with a small ball end and a fine liner brush with short bristles. Any basic set will do; our guide to nail art brushes and tools explains which sizes to choose. Work from a drop of gel on a palette, because the bottle brush holds too much gel for fine detail.
Hearts always go on a cured base. Push back the cuticle and remove it from the nail plate, lightly buff the shine, cleanse and dehydrate the nail, then apply and cure Classic Base Coat and your base colour. Paint and cure the hearts, then seal the whole nail with one top coat.
Learn this method first, because it gives the roundest, most even hearts. A larger ball makes a fuller heart, and the smallest ball gives micro hearts for short nails.

Load the liner brush lightly and wipe one side on the palette so the tip comes to a point. Paint the left half as a short curved stroke, like a comma, and lift the brush as you reach the bottom. Then paint the right half as its mirror image, ending at the same point. Strokes take more practice than dots but give a slimmer heart, and they are also how you draw an outline.
Here the heart is left bare and the colour goes around it. On a cured clear base, outline a heart in the centre of the nail with the liner brush and your colour gel. Fill the rest of the nail, working away from the outline and keeping a small gap of about a millimetre from the cuticle. Cure, then seal the whole nail so the bare heart is glossy too.

One small heart on the ring finger, with the other nails plain, is the quietest design here and suits the office. An overlay of B009 Rose Ballerine, a fresh ballerina pink builder gel, strengthens natural nails and gives an even colour in one step. On the cured overlay, set the heart in the third of the nail nearest the free edge. A heart a few shades deeper than the base stays discreet, while a deep red one stands out.
A tiny heart set just above the cuticle suits oval and almond shapes. Over 075 Beige, a soft natural beige, dot a 090 Fuchsia heart with the smallest ball and leave a clear gap of about a millimetre from the skin. Gel that touches the cuticle lifts, and uncured gel on skin is the main cause of gel allergy, so check the gap with the finger turned sideways before curing. A fingernail grows about three millimetres a month, so over the weeks the heart moves away from the cuticle.
For a pattern like printed fabric, scatter five to eight tiny Fuchsia hearts across each nail over 021 Cloud, a sheer milky white. Pale, sheer shades streak in one thick coat, so build Cloud in two thin coats and cure each one. Turn them at slightly different angles and let one or two run off the edge, but keep them the same size. Our polka dot nails use the same tool with single dots.
Heart nails work on short nails when the heart is about two millimetres wide, one per nail or on two accent nails. Paint them in Fuchsia over RB04 Pêche, a warm peach rubber base that levels the nail plate, adds strength to short natural nails and can be worn alone as a sheer colour. Our short nail ideas give more designs for this length.
Here the smile line is drawn as two small arches that meet in a dip at the centre, so the tip forms the top of a heart. It needs almond, oval or square nails with some free edge. Over a nude base such as Beige, paint each arch with the liner brush from the sidewall to the centre, then fill the tip. Fuchsia gives a bold, clean tip. Paint all the left arches first, then all the right ones, so the nails match.

Instead of a full tip, place four or five small hearts along the smile line. Mark the two ends with tiny dots, then work from the centre outwards so the row stays symmetrical and follows the curve. Medium-length almond and oval nails give the curve enough room. On a nude base, Fuchsia hearts make a playful line, and a black gel polish gives a sharper contrast.
Red on pale pink is the most familiar heart design, and small hearts keep it wearable beyond February. Build 080 Cotton Candy, a sugary pink, in two thin coats so it goes on without streaks. For the hearts, use Cat Eye 003 Ruby Dusk, a deep red shimmer. Paint the hearts without a magnet and cure each one straight away, then seal.
Painted in a shade close to the base, tonal hearts show only at close range, which suits a discreet manicure. Start with 083 Sugared Almonds, a powdery pink, and dot the hearts in 084 Peony. Because the two pinks are close, a heart can look faint once cured; if it does, add a second thin layer of Peony and cure again before the top coat.

A soft milky heart on 020 Raspberry, a bold raspberry pink, is easy to wear. Paint the heart with Cloud, a sheer milky white: one layer gives a translucent heart with the pink showing through, and a second thin layer after curing makes it more opaque. Keep it to one or two nails. For a heart that shows the natural nail instead, use the negative-space method.
Plum-pink hearts on a milky base go well with grey or camel winter coats and silver jewellery. Over two thin coats of Cloud, dot the hearts in 105 Sloe, a soft plum-pink. For a stronger colour, cure the heart and paint a second layer of Sloe over it. Two or three hearts per nail, at different heights, keep the design light.
The most graphic design in this list is a black heart on nude, and it suits short square nails as well as long almond ones. Over Beige, paint one heart per nail in a black gel polish. Black shows every wobble, so beginners should use the dotting method. To remove a heart before curing, wipe in one direction with a clean brush, because black pigment smears across a pale base.
For a split heart, paint one half on the middle finger and the mirror half on the ring finger, with the straight side of each half along the sidewalls that touch, so the full heart appears when the fingers are held together. Draw each half with the liner brush, in Fuchsia over Beige or Cloud. Before curing, hold the fingers side by side without letting the nails touch and check that the curves meet at the same height. Each half is too small to read on short nails, so keep this for medium or long nails.
For an outlined heart, only the line is painted and the base shows inside. Load the liner brush lightly, hold it almost flat to the nail and pull the line towards you rather than pushing it. Ruby Dusk or Fuchsia over Cloud reads well. If the line breaks, close the gap before curing, since a break is much harder to hide afterwards. Start with one accent nail.
A raised heart adds a little height and catches the light. Start with a cured overlay of B003 Milky White builder gel. Place two small beads of B021 Rouge Capucine, a vibrant red builder gel, side by side on the ring finger nail, then pull each one down with a fine brush to a shared point, as in the dotting method. Because the gel is self-levelling, it slowly flattens, so cure it straight away: 60 seconds under LED or 120 seconds under UV. Seal with top coat. For more raised designs, see our guide to 3D nail art with builder gel.

Almond and oval nails show a heart best, because the tapered shape frames a centred heart and leaves room for heart French tips. Square nails suit rows and outlines, and short nails suit one micro heart each.
With a base coat and top coat, gel polish lasts up to three weeks without chipping, and the hearts last just as long because they sit under the same top coat. Builder gel designs, including the raised heart, are filed off at the next infill, never soaked.
The simplest way is with a dotting tool: place two dots of gel side by side, then drag each one down to a shared point to form a V. Cure the heart before the top coat; a liner brush gives slimmer hearts but needs more practice.
With a liner brush, paint the smile line as two small arches that meet in a dip at the centre, then fill the tip. The design needs some free edge, so almond, oval and square nails suit it best.
Yes, as long as the hearts are small: about two millimetres wide, made with the smallest ball of a dotting tool. Split hearts and heart-shaped tips need more length.
Almost any pairing works when the heart contrasts with the base: red on pale pink, milky on raspberry, black on nude. For a discreet set, choose tonal hearts.
No. Small hearts on nude, milky or bright bases are worn all year, and plum-pink or black hearts suit autumn and winter.
Use a builder gel. Place two small beads side by side on a cured base, pull them down to one point and cure straight away, before the gel levels out. Keep raised hearts to one nail so they do not catch on hair or knitwear.
Most of the pinks, nudes and the milky white in these designs are in our gel polish range, and the milky and red gels for the raised heart are among our builder gels.
Nails for Men: The Men's Manicure, Step by Step
10 min read
French Tip Toes: How to Do a French Pedicure with Gel, Plus 10 Ideas
11 min read
Carnival Nails: 14 Bright Ideas with Glitter, Colour and Shine
12 min read
Neon Nails: 12 Bright Ideas and How to Make Neon Colours Pop
11 min read
Free delivery from $280.000
Shipped from Nice, France
Prepared in 1 to 2 business days
For orders placed before 2 pm, Paris time
14-day returns
From the day you receive your order
Secure payment
Encrypted checkout
Nail tech, salon or distributor? Join the Elegelli professional programme for pro pricing.


